
What is the relationship between information technology hardware and software?
Information Technology Systems
At its simplest, a motherboard is the main printed circuit board (PCB) in a computer. It serves as the “central nervous system,” providing the electrical connections and pathways (known as buses) that allow the various components of a system to communicate with one another.
Every piece of hardware, from the processor to the mouse, eventually connects to the motherboard.
Key Components
A motherboard is home to several critical sockets, slots, and chips:
- CPU Socket: The dedicated slot where the Central Processing Unit (the “brain”) is installed.
- RAM Slots: Long, thin slots designed to hold the system’s memory modules.
- Chipset: A set of chips that manages data flow between the CPU, memory, and peripherals. It acts as the “traffic controller” of the board.
- Expansion Slots (PCIe): Used for adding dedicated hardware like graphics cards, sound cards, or high-speed storage.
- Storage Connectors: Ports (usually SATA or M.2) for connecting hard drives and Solid State Drives (SSDs).
- I/O Panel: The cluster of ports on the back (USB, HDMI, Ethernet) used for external devices.
Core Functions
The motherboard performs three essential roles to keep a computer running:
- Power Distribution: It takes power from the Power Supply Unit (PSU) and regulates it so that each component receives the exact voltage it needs.
- Data Communication: It houses the “highways” (bus lines) that move bits of data between the processor, the storage, and the graphics card.
- BIOS/UEFI Firmware: It contains a small chip with the basic software needed to “boot” or start the computer and test the hardware before the operating system (like Windows or Linux) loads.
Form Factors
Motherboards come in different standardized sizes, known as form factors, which determine which computer cases they will fit into:
| Size | Common Name | Typical Use |
| 305 × 244 mm | ATX | Standard towers; offers the most expansion slots. |
| 244 × 244 mm | Micro-ATX | Compact desktops; a balance of size and features. |
| 170 × 170 mm | Mini-ITX | Small Form Factor (SFF) builds; very portable. |
What does a motherboard do?
Linus Tech Tips
Think of a motherboard as the central nervous system of a computer. While the CPU acts as the brain and the hard drive acts as the long-term memory, the motherboard is the physical framework and communication network that allows all these parts to talk to each other.
Without the motherboard, the individual components of a computer would just be isolated pieces of hardware with no way to share power or data.
Primary Functions
A motherboard performs four essential roles to keep a system running:
1. Data Routing and Communication
The motherboard contains a complex web of copper “traces” (electrical pathways) known as buses. These act like high-speed highways, carrying data between the CPU, the RAM (system memory), and the Graphics Card (GPU).
2. Power Distribution
The motherboard receives raw power from the Power Supply Unit (PSU). It uses a series of components called the VRM (Voltage Regulator Module) to “clean” and step down that power to the exact, stable voltages required by the sensitive processor and memory.
3. Hardware Hub (The “Backbone”)
It provides the physical sockets and slots for every piece of hardware:
- The Socket: Where the CPU is installed.
- DIMM Slots: Where the RAM modules click into place.
- PCIe Slots: Where you plug in expansion cards like high-end GPUs or Wi-Fi cards.
4. The “Handshake” (BIOS/UEFI)
The motherboard contains a small firmware chip called the BIOS (Basic Input/Output System) or UEFI. When you press the power button, this chip performs a “Power-On Self-Test” (POST) to make sure all hardware is functioning correctly before it hands control over to your operating system (like Windows, macOS, or Linux).
External Connectivity
The motherboard is also responsible for the I/O (Input/Output) Panel located at the back of your computer case. This is where the board translates signals from external devices—like your mouse, keyboard, monitor, and ethernet cable—into a language the internal processor can understand.
Form Factors
Motherboards come in standardized sizes to ensure they fit into different cases:
- ATX: The full-sized standard for most desktop towers.
- Micro-ATX: A slightly smaller square board for mid-sized builds.
- Mini-ITX: A tiny, specialized board for compact, portable PCs.
What is a processor?
A processor, or Central Processing Unit (CPU), is often described as the “brain” of a computer. It is the primary hardware component that interprets and executes the instructions of every program you run—from the simplest mouse click to complex weather modeling or 3D rendering.
Physically, it is a small, square silicon chip, usually about two inches wide, that sits in a dedicated socket on the motherboard.
How a Processor Works
The CPU operates in a continuous cycle known as the Instruction Cycle, which consists of four main steps:
- Fetch: The CPU retrieves an instruction from the system memory (RAM).
- Decode: The Control Unit translates the instruction into signals the rest of the CPU can understand.
- Execute: The Arithmetic Logic Unit (ALU) performs the actual calculation or data movement.
- Store: The result is written back into the memory for later use.
Key Performance Metrics
When looking at a processor, three main factors determine how “fast” or powerful it is:
1. Clock Speed
Measured in Gigahertz (GHz), this represents how many billions of cycles a processor can perform per second. For example, a $3.5\text{ GHz}$ processor can handle $3.5$ billion cycles every second.
2. Cores and Threads
- Cores: These are individual processing units within a single chip. A “Quad-core” processor has four separate “brains” that can work on different tasks simultaneously.
- Threads: Using technologies like Hyper-Threading, a single core can be split into two “virtual” cores to handle even more tasks at once.
3. Cache
This is a tiny amount of incredibly fast memory located directly on the processor die. It stores the data the CPU uses most frequently so it doesn’t have to wait for the slower RAM to provide it.
Major Manufacturers
In the consumer and professional market, two companies dominate the landscape:
- Intel: Known for the Core i3, i5, i7, and i9 series.
- AMD: Known for the Ryzen 3, 5, 7, and 9 series.
Specialized Processors
While the CPU handles general tasks, other processors exist for specific jobs:
- GPU (Graphics Processing Unit): Designed specifically for the high-speed math required for rendering images and video.
- NPU (Neural Processing Unit): A newer type of processor optimized specifically for AI and machine learning tasks.
What does a processor do?
At its core, a processor (CPU) is an incredibly fast calculator that handles every instruction a computer receives. It is the “director” of the system, constantly grabbing data from memory, figuring out what to do with it, and sending the results back out.
Every time you move your mouse, type a letter, or load a webpage, the processor is performing millions—sometimes billions—of tiny operations to make it happen.
The Four-Step Instruction Cycle
The processor operates in a continuous loop known as the Fetch-Decode-Execute-Writeback cycle. It repeats this billions of times every second.
- Fetch: The processor pulls an instruction from the system’s RAM.
- Decode: The “Control Unit” inside the CPU breaks that instruction down into binary code (1s and 0s) that the hardware understands.
- Execute: The Arithmetic Logic Unit (ALU) performs the actual math or logic required (e.g., $2 + 2 = 4$ or “If X is true, do Y”).
- Writeback: The result is saved back into the memory so the computer can use it for the next step.
Core Responsibilities
While the motherboard provides the pathways, the processor does the heavy lifting in three main areas:
1. System Coordination
The CPU acts as the “traffic cop” for all other hardware. It tells the hard drive when to send data, tells the RAM when to store it, and tells the graphics card what images to generate.
2. Mathematical Calculations
Everything you see on a screen is ultimately the result of math. Whether it’s calculating the physics of a falling object in a simulation or determining the trajectory of an aircraft based on atmospheric pressure, the CPU handles the raw logic.
3. Running the Operating System
When you start your computer, the CPU is responsible for loading the kernel of the operating system (like Windows or Linux). It manages the “threads” of every open application, switching between them so quickly that it feels like they are all running at once.
Multitasking: Cores and Threads
Modern processors don’t just have one “brain.” They use Cores and Threads to handle multiple tasks:
- Cores: Physical independent processing units. A 6-core processor can literally do six things at the exact same time.
- Threads: Virtual pathways that allow a single core to manage two tasks at once (often called Hyper-Threading or SMT).
| Component | Function |
| ALU | Handles arithmetic (+, -, X, ÷) and logic (AND, OR, NOT). |
| Control Unit | Directs the flow of data and tells the ALU what to do. |
| Registers | Ultra-fast, internal storage for data the CPU is using right now. |
| Cache | A “high-speed lane” for frequently used data to avoid waiting on slower RAM. |
Is there a way to speed processor operations?
LifeOS Mastery
There are several ways to speed up processor operations, ranging from simple software adjustments to advanced hardware modifications. Because the CPU is the “bottleneck” for many high-level tasks—like running complex simulations or compiling code—optimizing its efficiency can significantly impact system performance.
1. Hardware-Level: Overclocking
Overclocking is the process of manually increasing the processor’s clock frequency (measured in GHz) beyond its factory settings.
- How it works: By increasing the voltage and the “multiplier” in the BIOS/UEFI, you force the CPU to perform more instruction cycles per second.
- The Trade-off: Higher speeds generate significantly more heat and consume more power. If not cooled properly, this can lead to system crashes or permanent hardware damage.
2. Thermal Management (Thermal Throttling)
Modern processors have a safety feature called thermal throttling. When a CPU reaches a certain temperature (usually around 95°C to 100°C), it automatically slows itself down to prevent melting.
- How to improve it: * High-End Cooling: Replacing a stock air cooler with a high-performance heat sink or a Liquid Cooling (AIO) system.
- Thermal Paste: Re-applying high-quality thermal interface material between the CPU die and the cooler to ensure efficient heat transfer.
- Case Airflow: Ensuring a “push-pull” configuration of fans to exhaust hot air quickly.
3. Architectural Efficiency: Instruction Sets
Processors don’t just get faster by “spinning” faster; they get faster by being smarter. Modern CPUs use specialized Instruction Set Extensions to handle specific types of math much faster than general-purpose logic.
- AVX (Advanced Vector Extensions): These allow the CPU to perform “Single Instruction, Multiple Data” (SIMD) operations. Instead of calculating one piece of data at a time, it can calculate a whole “vector” of data simultaneously.
- Use Case: This is incredibly effective for heavy scientific calculations, such as fluid dynamics or atmospheric modeling.
4. Software & OS Optimization
Sometimes the processor is fast, but the software is inefficient.
- Multithreading: Ensuring the software is written to use all available Cores and Threads. If an application is “single-threaded,” it will only use a fraction of the CPU’s total power.
- Process Priority: In the OS Task Manager, you can set specific applications to “High Priority,” ensuring the CPU’s scheduler gives that task more “time slices” than background processes.
- XMP/DOCP Profiles: This is a “one-click” overclock for your RAM. By enabling this in the BIOS, you increase the speed at which the CPU can fetch data from memory, reducing the time it spends “waiting.”
5. Architectural Shifts (Offloading)
One of the best ways to “speed up” a processor is to give it less work to do.
- GPU Acceleration: Offloading complex parallel math (like rendering or matrix multiplication) to the Graphics Card.
- NPU (Neural Processing Unit): Using dedicated AI silicon for machine learning tasks, leaving the main CPU free for system logic.
What is cache?
In the context of a processor, cache is a small amount of ultra-fast memory built directly onto the CPU chip. It acts as a “high-speed buffer” between the processor and the main system memory (RAM).
Its primary purpose is to store the data and instructions that the CPU is most likely to need next, preventing the processor from having to wait for the much slower RAM.
The Memory Hierarchy
To understand cache, it helps to look at the speed and size trade-offs in a computer. As memory gets closer to the CPU, it becomes faster but much smaller and more expensive.
- Registers: Located inside the CPU cores; the fastest but smallest (measured in bytes).
- L1 Cache: Built into each core; extremely fast but very small (measured in kilobytes).
- L2 Cache: Slightly slower than L1 but larger; often shared between a few cores.
- L3 Cache: The largest and “slowest” cache layer; usually shared across all CPU cores (measured in megabytes).
- RAM: The main system memory; much larger but significantly slower than cache.
How It Works: “Cache Hits” and “Misses”
When the processor needs a piece of data, it follows a specific search order:
- Cache Hit: The CPU looks in the L1 cache first. If the data is there, it’s a “hit,” and the CPU processes it instantly. If not, it moves to L2, then L3.
- Cache Miss: If the data isn’t in any cache level, the CPU must reach out to the RAM. This is a “miss.” Because RAM is relatively far away and operates at lower speeds, the processor has to sit idle for hundreds of clock cycles—a delay known as latency.
Why Is It Important?
Cache is critical because modern processors are much faster than the memory they rely on. Without cache, a high-performance CPU would spend over 90% of its time doing nothing while waiting for data to arrive from the RAM.
Real-World Applications
- Complex Simulations: In fields like meteorology or fluid dynamics, the CPU performs the same types of calculations over and over on slightly different data. High L3 cache allows the processor to keep these “math templates” close at hand.
- Software Development: Compiling large amounts of code involves jumping between many small files; a larger cache keeps these instructions ready, significantly reducing wait times.
- Gaming: Modern games require constant communication between the CPU and the game engine’s logic. Processors with “3D V-Cache” (extra layers of L3) see massive performance boosts because they don’t have to fetch assets from the RAM as often.
What is clocking?
In computing, clocking (or clock speed) refers to the speed at which a processor executes instructions. Every processor has an internal “metronome” called a system clock that generates electrical pulses at a constant rate.
Each pulse represents a cycle, and the CPU uses these cycles to perform its basic operations.
Understanding Clock Speed
Clock speed is measured in Hertz (Hz). Modern processors operate in the Gigahertz (GHz) range, where 1 GHz equals one billion cycles per second.
- High Clock Speed: The processor can execute instructions faster, which is generally better for tasks that rely on a single “thread” of logic, like gaming or basic office applications.
- Low Clock Speed: The processor executes fewer cycles per second, but it typically consumes less power and generates less heat—ideal for laptops and mobile devices.
Types of Clocking
You will often see three different terms used when describing how a processor is “clocked”:
1. Base Clock
This is the “guaranteed” speed the processor runs at when performing standard tasks. It is the baseline frequency designed to keep the chip within its safe power and temperature limits.
2. Boost (Turbo) Clock
Modern CPUs can dynamically increase their speed when they detect a heavy workload (like rendering a video or running a simulation). The processor will “boost” to a higher frequency until it hits a temperature limit, at which point it will slow back down.
3. Overclocking
This is when a user manually forces the processor to run at a speed higher than its official factory rating. While this increases performance, it requires high-end cooling and can potentially shorten the lifespan of the hardware.
How it Relates to Performance
It is a common misconception that a higher clock speed always means a faster computer. Performance is actually determined by the relationship between two factors:
Performance = Clock Speed * IPC (Instructions Per Cycle)
- IPC: This is a measure of how much “work” a processor can get done in a single cycle.
- The Comparison: A newer processor running at 3.0 GHz might actually be faster than an older processor running at 4.0 GHz because the newer architecture has a much higher IPC.
The “Wall”: Why Speeds Stopped Climbing
In the early 2000s, clock speeds increased rapidly, but they eventually hit a “thermal wall” around $5.0\text{ GHz}$.
Increasing clock speed requires more voltage, and more voltage creates exponential amounts of heat. This is why modern manufacturers now focus on adding more Cores (more “brains” working in parallel) and improving Cache rather than just making the clock speed faster.
What is threading technology?
Threading technology is a method that allows a single physical processor core to act like two “logical” cores. It is designed to keep the CPU’s execution units as busy as possible by feeding them two streams of instructions simultaneously.
In the industry, you will most commonly hear this referred to as Hyper-Threading (Intel’s term) or Simultaneous Multithreading (SMT) (AMD’s term).
Why Is It Needed?
Even though a CPU core is incredibly fast, it often has “downtime.” When a processor core works on a task, it sometimes has to wait for data to arrive from the RAM or the hard drive. During those tiny fractions of a second, the core sits idle.
Threading technology uses that idle time to process a second “thread” of data.
Physical Cores vs. Logical Threads
It is important to distinguish between the physical hardware and the virtual paths:
- Physical Core: An actual, independent processing unit etched onto the silicon.
- Logical Thread (Virtual Core): A virtual pathway that the Operating System (OS) sees as a separate processor.
If you have a 4-core processor with threading technology, your computer’s Task Manager will show 8 logical processors. The OS can then assign different tasks to each of those 8 paths.
How It Works (The “Stove” Analogy)
Think of a CPU core as a chef at a stove.
- Without Threading: The chef prepares one dish. While the water is boiling, the chef stands still and waits.
- With Threading: While the water is boiling for the first dish, the chef immediately starts chopping vegetables for a second dish. The chef hasn’t doubled in size, but they are using their “waiting time” more efficiently.
Performance Benefits
The impact of threading depends heavily on what you are doing:
| Task Type | Threading Impact |
| Gaming | Moderate. Most games care more about high clock speeds on a few cores rather than many threads. |
| Video Rendering / 3D Modeling | High. These tasks are “perfectly parallel,” meaning they can be broken into tiny pieces and distributed across every available thread. |
| Scientific Computing | Very High. Complex math like atmospheric dynamics or calculus-heavy simulations benefits greatly from the extra logical paths. |
| Web Browsing | Low. Most background tasks are light enough that the extra threads aren’t fully utilized. |
Does it double the speed?
No. Because the two threads are sharing the same physical execution hardware, a core with threading is generally about 15% to 30% faster than a core without it. It is not as powerful as having two actual physical cores, but it is a very efficient way to squeeze more performance out of the existing hardware.
What are the connections to the processor?
To function, a processor must be connected to almost every other part of the computer. These connections happen through the CPU socket on the motherboard, which acts as the interface between the silicon chip and the rest of the hardware.
The connections can be divided into three main categories: Power, Data, and Thermal.
1. Electrical & Power Connections
The processor requires a massive amount of electricity, but it must be delivered at a very low and stable voltage.
- Vcore (Voltage Core): The motherboard’s VRM (Voltage Regulator Module) takes 12 V from the power supply and steps it down to roughly 1.2 V to 1.4 V for the CPU.
- Pins/LGA Pads: Depending on the brand, the processor connects to the socket via hundreds (or thousands) of tiny gold-plated pins or pads. Each pin has a specific job—some provide power, some are “grounds,” and some carry data.
2. Data Highways (The Buses)
The processor communicates with other components through high-speed “lanes” etched into the motherboard.
- Memory Bus: A direct, ultra-fast connection to the RAM. This is where the CPU fetches instructions and stores temporary data.
- PCIe Lanes: These are dedicated “expressways” for high-bandwidth hardware. Most CPUs have direct lanes to the Graphics Card (GPU) and NVMe SSDs to ensure there is zero delay in processing visual or storage data.
- Chipset Interconnect: The CPU also connects to the motherboard’s chipset, which handles “slower” devices like USB ports, SATA drives, and onboard audio.
3. Thermal Interface
While not an electrical connection, the physical connection to a cooling system is vital. If this connection fails, the processor will shut down within seconds to prevent melting.
- The IHS (Integrated Heat Spreader): This is the metal lid on top of the CPU.
- Thermal Paste: A specialized compound applied between the IHS and the cooler to fill in microscopic air gaps and ensure heat moves efficiently.
- CPU Cooler: A heat sink and fan (or liquid block) is clamped onto the processor to dissipate the heat generated by its billions of transistors.
Connection Summary
| Connection | Destination | Purpose |
| VRM Pins | Power Supply | Delivers stable electricity. |
| Memory Channels | RAM | High-speed data exchange for active tasks. |
| PCIe Lanes | GPU / Storage | High-bandwidth communication for graphics and files. |
| DMI/LPC Bus | Chipset | Manages peripherals (USB, Keyboard, Mouse). |
What are multicore processors?
A multicore processor is a single computing component (a chip) that contains two or more independent processing units, called cores.
Instead of having one single “brain” doing all the work, a multicore processor acts like a team of experts working together. Each core is capable of reading and executing its own set of instructions, allowing the computer to perform multiple tasks simultaneously or complete a single complex task much faster.
Why Multicore?
In the past, manufacturers made computers faster by increasing the clock speed (making the single brain think faster). However, this created immense heat and consumed too much power.
The industry shifted to a “multicore” approach: rather than making one core run at an impossible speed, they put multiple cores on one chip running at efficient speeds.
How Multicore Processors Work
Think of the processor as a checkout area in a grocery store:
- Single-core: One cashier. No matter how fast they scan, a long line of customers (tasks) will eventually slow things down.
- Multicore: Multiple cashiers. Even if they scan at the same speed as the single-core cashier, they can handle multiple customers at once, clearing the line much faster.
Parallel Processing
When you run a program designed for multiple cores—such as a video editor, a 3D renderer, or a complex scientific simulation—the software breaks the workload into “chunks.” Core 1 handles the first chunk, Core 2 handles the second, and so on. This is called Parallel Processing.
Common Configurations
You will see processors labeled based on the number of cores they possess:
| Core Count | Name | Typical Use Case |
| 2 Cores | Dual-core | Basic web browsing and office documents. |
| 4 Cores | Quad-core | Standard multitasking, light gaming, and student work. |
| 6–8 Cores | Hexa/Octa-core | High-end gaming, streaming, and software development. |
| 12–64+ Cores | Workstation/Server | Professional video production, 3D animation, and heavy math/simulations. |
Efficiency: Performance vs. Power
One of the greatest advantages of multicore design is power efficiency.
- Task Distribution: Two cores running at 2.0 GHz can often outperform a single core running at 4.0 GHz while generating significantly less heat.
- Background Tasks: While you are focused on a primary task (like writing code or a report), the extra cores handle background operations like system updates, virus scans, and browser tabs without slowing down your main work.
The Role of Software
It is important to note that a 16-core processor isn’t always 16 times faster than a 1-core processor. The software must be written to be “multi-threaded” to take advantage of the extra cores. If a program is “single-threaded,” it will only use one core, leaving the others idle.
What is a graphics processing unit (GPU)?
A Graphics Processing Unit (GPU) is a specialized electronic circuit designed to manipulate and alter memory to accelerate the creation of images in a frame buffer intended for output to a display.
While the CPU (Central Processing Unit) is a generalist designed to handle a wide range of tasks one after another, the GPU is a specialist. It is built for parallel processing, meaning it can handle thousands of small, repetitive mathematical tasks simultaneously.
CPU vs. GPU: The Core Difference
The best way to visualize the difference is by looking at their internal architecture:
- CPU: Typically has a few powerful cores (e.g., 8 to 16) optimized for sequential serial processing. It is like a high-speed delivery van that can carry a few items very quickly across town.
- GPU: Has thousands of smaller, more efficient cores. It is like a massive freight train with hundreds of cars; it moves slower than the van, but it can transport a massive amount of data all at once.
Primary Functions of a GPU
1. Rendering Graphics
In gaming or 3D design, the GPU calculates the lighting, textures, and geometry of a scene. It processes the millions of polygons required to create a 3D image and converts them into the 2D pixels you see on your monitor.
2. Video Encoding and Decoding
Modern GPUs have dedicated hardware blocks for processing video. When you watch a high-definition stream or export a video file, the GPU handles the heavy compression math, freeing up the CPU for other tasks.
3. Parallel Computing (GPGPU)
Because GPUs are so good at math, they are now used for non-graphical tasks. This is called General-Purpose computing on Graphics Processing Units.
- Scientific Simulations: Calculating fluid dynamics, weather patterns, or complex physics.
- Artificial Intelligence: Training machine learning models, which requires massive matrix multiplication.
- Cryptocurrency: Solving the complex algorithms required for blockchain mining.
Types of GPUs
There are two main ways a GPU is integrated into a system:
| Type | Description | Best For |
| Integrated (iGPU) | Built directly into the same chip as the CPU. Shares the system’s RAM. | Laptops, office work, and light media consumption. |
| Discrete (dGPU) | A separate hardware “card” with its own dedicated memory (VRAM) and cooling system. | Gaming, 3D rendering, and heavy scientific work. |
Key Components of a GPU
- VRAM (Video RAM): Dedicated high-speed memory used to store image data and textures so the GPU doesn’t have to wait on the slower system RAM.
- CUDA Cores / Stream Processors: The individual “math engines” that do the actual work.
- Memory Bus: The “highway” that determines how much data can move between the VRAM and the GPU cores at once.
What is virtualization?
Virtualization is a technology that allows you to create multiple simulated environments, or “virtual machines” (VMs), from a single physical hardware system.
Essentially, it acts as a layer of abstraction that hides the physical characteristics of computing resources from the users. Instead of one computer running one operating system, virtualization allows that same computer to act like several independent machines, each running its own software and operating system.
How It Works: The Hypervisor
The key to virtualization is a thin layer of software called the hypervisor. The hypervisor sits between the physical hardware and the virtual machines. It intercepts the “requests” from the virtual operating systems and manages the distribution of physical resources (CPU, RAM, Storage).
There are two main types of hypervisors:
- Type 1 (Bare Metal): Runs directly on the system’s hardware (e.g., VMware ESXi, Microsoft Hyper-V). This is common in data centers.
- Type 2 (Hosted): Runs as an application on top of a traditional operating system (e.g., Oracle VirtualBox, VMware Workstation). This is what you might use on a personal desktop to run Linux inside Windows.
Core Benefits
1. Resource Efficiency
In a traditional setup, a server might only use 10% to 15% of its processing power. Virtualization allows you to “stack” multiple servers onto one physical box, pushing hardware utilization much higher and saving on electricity and physical space.
2. Isolation and Security
Each Virtual Machine is a “sandbox.” If one VM crashes or gets infected by a virus, it does not affect the other VMs or the physical host. This makes it a perfect environment for testing new software or running older, less secure applications.
3. Portability and Snapshotting
Because a VM is essentially just a set of files, you can “snapshot” its exact state. If a software update fails, you can instantly revert to the snapshot from ten minutes ago. You can also move a VM from one physical server in Calgary to another in Toronto without any downtime.
Common Types of Virtualization
| Type | Description |
| Server Virtualization | The most common type; masking server resources to run multiple OS instances on one server. |
| Desktop Virtualization (VDI) | Allows a user to access their “desktop” from any device; the actual processing happens on a central server. |
| Network Virtualization | Splitting available bandwidth into independent channels that can be assigned to specific servers in real-time. |
| Storage Virtualization | Pooling physical storage from multiple network devices so they look like a single, massive storage unit. |
Virtualization vs. Cloud Computing
While people often use these terms interchangeably, they are different:
- Virtualization is the technology that creates the virtual environments.
- Cloud Computing is a service that delivers those virtualized resources to you over the internet. You can have virtualization without the cloud, but you cannot have the cloud without virtualization.
What are intel processors?
Intel processors are the CPUs designed and manufactured by Intel Corporation, the world’s largest semiconductor chip manufacturer. For decades, they have been the industry standard for personal computers, servers, and data centers.
Most Intel processors use the x86 architecture, which is the same language used by Windows and macOS (on older Macs), making them compatible with almost all mainstream software.
The Current Core Branding
Most consumers interact with the Intel Core family. Intel uses a specific numbering system to help users identify the power level and generation of the chip.
1. The Product Tiers
- Core i3: Entry-level. Best for basic office work, web browsing, and students.
- Core i5: Mid-range. The “sweet spot” for most users, balancing price and performance for gaming and multitasking.
- Core i7: High-end. Designed for video editing, 3D rendering, and enthusiast gaming.
- Core i9: Flagship. Maximum performance for professional workstations and extreme multitasking.
2. The New Branding (Core Ultra)
Starting in late 2023, Intel began transitioning to a new naming convention called Intel Core Ultra. These chips (like the Ultra 5, 7, and 9) are designed with built-in NPUs (Neural Processing Units) specifically for AI tasks and improved power efficiency.
How to Read an Intel Model Name
Intel names can look like a string of random numbers, but they follow a strict logic:
Example: Intel® Core™ i7-14700K
- Brand: Intel Core
- Modifier: i7 (The performance tier)
- Generation: 14 (The “14th Generation”)
- SKU: 700 (The specific model number within that tier)
- Suffix: K (Indicates the processor is “unlocked” for overclocking)
Other Intel Processor Families
Intel also makes specialized chips for different environments:
| Series | Target Audience | Key Feature |
| Xeon | Servers & Data Centers | Supports massive amounts of RAM and “ECC” (Error Correction) memory. |
| Pentium / Celeron | Ultra-budget PCs | Basic functionality with very low power consumption. |
| vPro | Enterprise/Business | Includes extra security and remote management features for IT departments. |
Hybrid Architecture (P-Cores and E-Cores)
Starting with the 12th Generation, Intel introduced a Hybrid Architecture similar to what you find in smartphones. Instead of all cores being the same, they split them into two types:
- P-Cores (Performance): Larger, powerful cores that handle heavy tasks like gaming or calculations.
- E-Cores (Efficient): Smaller cores that handle background tasks (like Windows updates or browser tabs), saving power and leaving the P-Cores free for your main work.
Technical Considerations
If you are looking to upgrade or build a system, remember that Intel processors require a matching Socket and Chipset. For example, a 14th Gen Intel processor uses the LGA 1700 socket. You cannot put an Intel chip into an AMD motherboard, and vice-versa.
What are AMD processors?
AMD (Advanced Micro Devices) processors are the primary alternative to Intel in the computer market. While they perform the same basic function as any CPU, AMD has distinguished itself through a focus on multi-core efficiency, backward compatibility, and specialized gaming technology. –
As of 2026, AMD is widely regarded as the performance leader in gaming and high-end workstation tasks with their Ryzen lineup.
1. The Ryzen Product Tiers
AMD uses a numbering system similar to Intel’s to help you identify the performance level of their chips:
- Ryzen 3: Budget-friendly; ideal for home office work and light browsing.
- Ryzen 5: The most popular tier; provides excellent balance for students and mid-range gaming.
- Ryzen 7: High-performance; designed for serious gaming and professional multitasking.
- Ryzen 9: Enthusiast-grade; features the highest core counts for video editing and complex simulations.
- Threadripper: Extreme workstation CPUs with up to 96+ cores for Hollywood-level rendering and data science.
2. Key Technology: 3D V-Cache (X3D)
One of AMD’s most significant innovations is 3D V-Cache, found in processors ending with the “X3D” suffix (e.g., Ryzen 7 9800X3D).
- The Problem: Standard CPUs are limited by how much cache memory can fit on a flat piece of silicon.
- The Solution: AMD “stacks” extra cache memory vertically on top of the processor cores.
- The Result: This massive pool of high-speed memory allows the CPU to store almost an entire game’s logic on the chip itself, virtually eliminating the “wait time” for data from the RAM. This makes X3D chips the fastest gaming processors in the world.
3. Platform Longevity (The “AM5” Socket)
One of AMD’s biggest selling points is their commitment to a single motherboard socket for many years.
- Socket AM4: Lasted over 5 years, allowing users to upgrade from a 2017 processor to a 2022 processor without buying a new motherboard.
- Socket AM5: The current standard (used by Ryzen 7000, 8000, and 9000 series). AMD has pledged to support this socket through at least 2027, making it a very cost-effective choice for long-term builds.
4. Modern Architectures (Zen 5 and Ryzen AI)
In 2026, AMD’s newest processors are built on the Zen 5 architecture, which focuses on:
- IPC Gains: Getting more “work” done in every clock cycle compared to older models.
- Ryzen AI: Many new AMD chips (like the Ryzen AI 400 series) now include a dedicated NPU (Neural Processing Unit). This handles AI tasks like background noise cancellation or local generative AI models without slowing down the main CPU cores.
AMD vs. Intel Comparison
| Feature | AMD (Ryzen) | Intel (Core) |
| Gaming | Often leads due to 3D V-Cache. | Highly competitive with high clock speeds. |
| Efficiency | Generally uses less power and runs cooler. | Uses a “Hybrid” (P-core/E-core) design for efficiency. |
| Upgradability | High; sockets usually last many generations. | Moderate; sockets typically change every 2 generations. |
| Integrated Graphics | Often superior iGPUs (Radeon) for light gaming. | Strong video encoding/decoding (QuickSync). |
What are CPU sockets?
IT Boost by Formip
A CPU socket is the physical and electrical interface on a motherboard that holds the processor. It acts as the “docking station” for the computer’s brain, providing thousands of tiny contact points that allow power to flow in and data to flow out to the rest of the system.
Because a socket allows you to “plug in” a CPU rather than soldering it down permanently, it is what makes desktop computers modular and upgradable.
How It Works
The socket is more than just a bracket; it is a complex grid of connectors.
- The Connection: Each pin or pad in the socket has a specific job. Some provide the 1.2V to 1.4V of power needed for calculations, others are “ground” wires, and many are dedicated “lanes” for communicating with the RAM and Graphics Card.
- The Locking Mechanism: To ensure perfect electrical contact, sockets use a Retention Arm or a pressure plate. This “clamping” force is necessary because even a microscopic gap between a pin and the CPU would cause the system to fail.
- Alignment (The Triangle): Sockets and CPUs are “keyed” so they can only be installed in one direction. Usually, a small gold triangle on the corner of the CPU must line up with a corresponding triangle on the socket.
The Three Main Socket Types
In 2026, you will encounter three primary designs, each used for different types of computers:
1. LGA (Land Grid Array)
- Design: The fragile pins are located on the motherboard socket, while the bottom of the CPU is covered in flat gold pads (called “lands”).
- Who uses it: All modern Intel processors and the latest AMD Ryzen (AM5) series.
- Benefit: It is harder to damage the expensive CPU, though you must be extremely careful not to touch the pins on the motherboard.
2. PGA (Pin Grid Array)
- Design: The pins are located on the bottom of the CPU, and the socket has a grid of holes to receive them.
- Who uses it: Older AMD Ryzen chips (AM4 and earlier) and some specialized hardware.
- Benefit: The motherboard socket is very durable, but the pins on the CPU can be easily bent if dropped.
3. BGA (Ball Grid Array)
- Design: The CPU is permanently soldered to the motherboard using tiny balls of solder.
- Who uses it: Laptops, tablets, and “mini-PCs.”
- Benefit: It saves space and allows for thinner devices, but it means you cannot upgrade the processor without replacing the entire motherboard.
Major Sockets in 2026
Socket compatibility is the #1 rule of PC building. You cannot put an Intel chip in an AMD socket, and even within the same brand, sockets change every few years.
| Socket Name | Brand | Supported Processors (Example) |
| LGA 1851 | Intel | Core Ultra 200S “Arrow Lake” and 2026 Refreshes. |
| AM5 | AMD | Ryzen 7000, 8000, and 9000 (Zen 5) series. |
| LGA 1700 | Intel | 12th, 13th, and 14th Gen Core i-series (Legacy). |
| AM4 | AMD | Ryzen 1000 through 5000 series (Legacy). |
Why Do Sockets Change?
Manufacturers change socket designs when they need to add more pins for new technology. For example, moving from DDR4 to DDR5 memory or from PCIe 4.0 to PCIe 5.0 requires more electrical pathways than older sockets could provide.
How are processors cooled?
In 2026, cooling a processor is no longer just about blowing air. As CPUs and GPUs become more powerful—especially for tasks like AI training, video rendering, and high-level calculus simulations—cooling has evolved into a precision science.
Processors are cooled using several distinct methods, categorized by how they move heat away from the silicon.
1. Air Cooling (Traditional)
This remains the most common method for home and office computers. It relies on a combination of a heat sink and a fan.
- Heat Pipes: Modern air coolers use hollow copper tubes filled with a small amount of liquid. When the CPU gets hot, the liquid evaporates, moves to the top of the cooler, releases its heat to the fins, and condenses back into a liquid to repeat the cycle.
- Precision Airflow: In 2026, fans are no longer “dumb” peripherals. They use AI-driven sensors to adjust speeds based on workload patterns, preventing heat spikes before they even occur.
2. Liquid Cooling (Direct-to-Chip)
Liquid is much more efficient at carrying heat than air. This method is the “baseline” for high-performance systems in 2026.
- AIO (All-In-One): A closed-loop system where a pump sits on the CPU, circulating coolant to a radiator. It’s quiet and highly effective for processors like the Intel Core i9 or Ryzen 9.
- Custom Loops: Used by enthusiasts, these involve separate reservoirs, pumps, and clear tubing.
- Two-Phase Cooling: An advanced version where the coolant actually boils on the surface of the processor (absorbing massive amounts of energy) and then condenses in a heat exchanger.
3. Immersion Cooling (The “Gold Standard”)
For extreme density, such as data centers or AI research labs, the entire computer is submerged in a dielectric liquid—a special fluid that conducts heat but not electricity.
- Single-Phase: The liquid stays liquid and is pumped through a cooling unit.
- Two-Phase: The liquid boils as the server works, creating a self-sustaining “rain” cycle inside a sealed tank. This eliminates the need for fans entirely, reducing noise and energy use by up to 90%.
4. Thermal Interface Materials (TIM)
No matter the cooling method, the “bridge” between the processor and the cooler is vital.
- Traditional Thermal Paste: A ceramic or metallic grease that fills microscopic air gaps.
- Liquid Metal: A gallium-based alloy with much higher thermal conductivity. While risky (it conducts electricity), it can drop temperatures by an additional 10°C to 20°C compared to standard paste.
- Phase Change Materials (PCM): These start as a solid pad but melt into a high-performance liquid once the processor reaches a specific temperature, offering the reliability of a pad with the performance of a paste.
Comparison of Cooling Technologies
| Method | Best For | Noise Level | Complexity |
| Air Cooling | Daily tasks, mid-range gaming | Moderate | Low |
| AIO Liquid | High-end gaming, video editing | Low | Medium |
| Custom Liquid | Overclocking, aesthetics | Very Low | High |
| Immersion | AI clusters, Render farms | Silent | Extreme |
How are processors installed?
Installing a processor is a precise but straightforward process. Because the pins and contacts are microscopic and fragile, the most important rule is never to use force.
Here is the step-by-step procedure for modern Intel (LGA 1851/1700) and AMD (AM5) sockets.
1. Preparation and Safety
Before touching any hardware, you must eliminate the risk of Electrostatic Discharge (ESD), which can fry sensitive circuitry.
- Ground Yourself: Wear an anti-static wrist strap clipped to a metal part of your case, or frequently touch a grounded metal object (like a radiator or the unpainted metal of your PC case).
- Clear the Workspace: Work on a hard, flat surface. Avoid working on carpet or wearing wool/synthetic fabrics that generate static.
- Handle by the Edges: Never touch the gold pads on the bottom of the CPU or the pins in the socket. Skin oils and static can cause permanent damage.
2. Opening the Socket
Modern desktop motherboards use a Zero Insertion Force (ZIF) design.
- Release the Lever: Push the metal retention arm down and slightly out to unhook it from its notch.
- Lift the Load Plate: Lift the arm all the way up. On Intel and AM5 boards, this will also raise the metal “door” (load plate) that covers the socket.
- Leave the Plastic Cap: Do not pull the plastic protective cap off manually. It is designed to pop off automatically once the CPU is installed and the lever is locked.
3. Seating the Processor
This is the most critical step. The CPU will only fit in one specific orientation.
- Find the Alignment Markers: Look for a tiny gold triangle in one corner of the CPU. Match this with the triangle marked on the motherboard socket.
- Check the Notches: Modern CPUs have semi-circle notches on the sides that line up with plastic tabs in the socket.
- The “Drop” Test: Gently lower the CPU straight down into the socket. It should fall into place by its own weight. Do not press down. If it is sitting level and doesn’t move when wiggled slightly, it is seated.
4. Locking it Down
- Lower the Plate: Carefully lower the metal load plate over the CPU.
- Engage the Lever: Lower the retention arm. You will feel a significant amount of resistance—this is normal. As you push the lever down, the plastic protective cap will pop out (save this for future use).
- Secure the Hook: Lock the arm back into its original notch.
5. Thermal Paste and Cooling
A CPU cannot run for more than a few seconds without a cooler.
- Apply Thermal Paste: Place a pea-sized amount of thermal paste in the center of the CPU’s metal lid. (Skip this if your cooler has pre-applied paste).
- Mount the Cooler: Place your heat sink or liquid block onto the CPU and tighten the screws in a cross pattern (Top-Left, Bottom-Right, etc.) to ensure even pressure.
- Connect Power: Plug the cooler’s fan or pump cable into the CPU_FAN header on the motherboard.
Would you like me to find a specific motherboard manual or compatibility list for a processor you are currently looking to install?
How to install an Intel Core Ultra 200 processor
This video provides a clear, visual walkthrough of the installation process for the latest generation of desktop processors, highlighting the specific alignment and latching steps.
How are processors upgraded?
Upgrading a processor is a high-impact way to improve performance, but it is a multi-stage process that requires verifying compatibility before you ever touch the hardware. In 2026, with the shift toward AI-capable NPUs and DDR5 memory, ensuring your motherboard can handle the new chip’s power and data requirements is the most critical step.
1. Verify Socket and Chipset Compatibility
Before purchasing a new CPU, you must ensure it is physically and electronically compatible with your current motherboard.
- The Socket: As discussed, your new CPU must use the same socket (e.g., AM5 for AMD or LGA 1851 for the latest Intel) as your motherboard.
- The Chipset: Even if the socket is the same, the motherboard’s chipset (e.g., B650 vs. X870) must support the specific generation of the processor.
- The VRMs: High-end processors (like a Ryzen 9 or Core Ultra 9) draw significant power. Ensure your motherboard’s Voltage Regulator Modules (VRMs) are robust enough to handle the increased electrical load.
2. Perform a BIOS Update
This is the most common reason an upgrade fails. If you buy a processor that was released after your motherboard was manufactured, the motherboard won’t “recognize” it.
- Download: Visit the motherboard manufacturer’s website and download the latest BIOS/UEFI firmware onto a USB drive.
- Flash: While your old CPU is still installed, enter the BIOS menu and use the “Flash” utility to update the firmware.
- Confirm: Once the update is complete and the system reboots successfully, you are ready to swap the hardware.
3. Physical Swap Procedure
Once the software is prepared, the physical swap follows these steps:
- Remove the Cooler: Unplug the fan cable and unscrew the cooler. If the thermal paste has made the cooler “stick” to the CPU, gently twist the cooler back and forth to break the seal; never pull straight up with force.
- Clean the Surface: Use 90% Isopropyl Alcohol and a lint-free cloth to clean the old thermal paste off the bottom of the cooler.
- Swap the CPU: Open the retention lever, remove the old processor (storing it in an anti-static bag), and drop the new one in using the “Triangle” alignment method.
- Re-Paste and Re-Mount: Apply fresh thermal paste and re-install your cooler.
4. Post-Installation Check
After the first boot with the new processor, you should perform a “Burn-in” test.
- BIOS Recognition: Ensure the BIOS correctly identifies the new model name and core count.
- Thermal Monitoring: Use software like HWMonitor or Ryzen Master to ensure the CPU is idling at a safe temperature (usually 30°C to 45°C).
- Stability Test: Run a benchmark like Cinebench or a physics simulation. This pushes the new CPU to its limit to ensure your power supply and cooling can handle the new hardware under load.
Upgrade Limitations
| Component | Can you upgrade the CPU? | Reason |
| Desktop PC | Yes | Uses modular sockets (LGA/PGA). |
| Laptop | No | CPUs are typically soldered (BGA) to the board. |
| All-in-One PC | Rarely | Most use laptop-style soldered components. |
How are processors overclocked?
Overclocking is the process of manually increasing a processor’s clock frequency beyond its factory-rated specifications. This allows the CPU to perform more operations per second, effectively boosting performance for demanding tasks like 3D rendering, complex calculus computations, or gaming.
1. The Core Variables
To overclock a processor, you must balance three primary settings within the BIOS/UEFI or specialized software:
- Base Clock (BCLK): The foundational frequency for the entire system (usually 100 MHz). Increasing this affects the CPU, RAM, and PCIe bus simultaneously, making it a “coarse” and often unstable adjustment.
- CPU Multiplier: The number the BCLK is multiplied by to reach the final clock speed. For example, a 100 MHz BCLK with a 45x multiplier results in a 4.5 GHz clock speed. This is the primary tool for overclocking.
- Vcore (Core Voltage): The electrical pressure supplied to the CPU. Higher speeds require more voltage to remain stable, but more voltage generates exponential amounts of heat.
2. The Overclocking Process
The safest way to overclock is through a “step-and-test” methodology:
- Establish a Baseline: Run a stress test at stock settings to record your “normal” maximum temperatures and performance scores.
- Increase the Multiplier: Enter the BIOS and increase the CPU multiplier by a small increment (e.g., from 45x to 46x).
- Stress Test: Boot into the operating system and run a heavy workload (like a physics simulation or Cinebench). If the system crashes or “Blue Screens,” the speed is unstable.
- Adjust Voltage: If unstable, slightly increase the Vcore (in tiny increments like 0.01 V) to provide the necessary electrical stability.
- Monitor Thermals: Check that the CPU stays below its thermal throttling limit (typically 95°C). If it gets too hot, you must either improve your cooling or lower the clock speed.
3. Necessary Hardware
Not all hardware is capable of being overclocked. You need a specific combination of components:
- An Unlocked CPU: * Intel: Models ending in “K” or “KF” (e.g., i7-14700K).
- AMD: Almost all Ryzen processors are “unlocked” from the factory.
- A Compatible Motherboard:
- Intel: Requires a “Z” or “X” series chipset (e.g., Z790).
- AMD: Requires a “B” or “X” series chipset (e.g., B650 or X870).
- High-End Cooling: Because overclocking increases heat production, an aftermarket air cooler or a liquid cooling (AIO) system is essential.
4. Modern “Auto” Overclocking
In 2026, many users prefer automated tools that use AI to find the optimal balance of speed and heat without manual BIOS adjustments:
- Intel Extreme Tuning Utility (XTU): A Windows-based application that allows for real-time adjustments and provides a “one-click” overclocking feature.
- AMD Precision Boost Overdrive (PBO): An intelligent algorithm that automatically pushes the CPU to its maximum safe limit based on the motherboard’s power delivery and the current temperature.
5. Risks and Considerations
While overclocking provides “free” performance, it carries significant trade-offs:
- Reduced Lifespan: Running at high voltages can cause electromigration, which slowly degrades the silicon over time.
- Instability: An unstable overclock can cause data corruption—a major risk if you are working on critical academic or professional files.
- Warranty: While most modern chips have safety shutdowns, pushing excessive voltage can void your manufacturer’s warranty.
How are CPU thermal solutions installed?
Installing a thermal solution is a critical final step in a PC build. The goal is to create a perfect “heat bridge” between the processor’s metal lid (the Integrated Heat Spreader) and the base of the cooler.
In 2026, most solutions follow a standardized mounting process for the major sockets like LGA 1851/1700 and AM5.
1. Prepare the Surfaces
Whether you are installing a brand-new cooler or replacing an old one, the contact surfaces must be chemically clean.
- Remove Old Paste: If upgrading, use 90% Isopropyl Alcohol and a lint-free cloth to wipe away old residue from the CPU.
- Inspect the Cooler Base: New coolers often have a clear plastic sticker on the bottom. You must remove this, or the CPU will overheat and shut down within seconds.
2. Install the Mounting Hardware
Most coolers are “multi-platform,” meaning they come with different brackets for Intel and AMD.
- The Backplate: For Intel systems, you typically place a plastic or metal bracket behind the motherboard. For modern AMD (AM5) systems, you usually use the metal backplate that is already built into the motherboard.
- Stand-offs: Screw the threaded spacers (stand-offs) into the backplate. These ensure the cooler sits at the exact height required for proper pressure.
3. Apply Thermal Interface Material (TIM)
Thermal paste fills microscopic air gaps that would otherwise trap heat.
- The “Pea” Method: Place a small bead of paste (about 5-6mm wide) in the center of the CPU. The pressure of the cooler will spread it into a thin, even circle.
- Specialty Materials: If using a Phase Change Material (PCM) pad, simply center the pad on the CPU. If using Liquid Metal, you must carefully paint a thin layer onto both the CPU and the cooler base using a cotton swab.
4. Mount the Heat Sink or Water Block
- Alignment: Lower the cooler straight down onto the stand-offs. Try not to lift or tilt it once it touches the paste to avoid air bubbles.
- The Cross Pattern: This is the most important part of the installation. Tighten the screws in an “X” pattern (Top-Left, then Bottom-Right, then Top-Right, then Bottom-Left).
- Torque: Turn each screw a few times before moving to the next. This ensures even pressure across the silicon, preventing “hot spots” or memory errors caused by an unevenly seated CPU.
5. Connect the Power
The motherboard needs to “talk” to the cooling system to manage temperatures.
- Air Coolers: Plug the fan cable into the header labeled CPU_FAN.
- Liquid Coolers (AIO): * The Pump cable usually goes into AIO_PUMP or CPU_OPT (this ensures the pump runs at a constant, high speed).
- The Radiator Fans go into CPU_FAN.
Troubleshooting the Installation
| Symptom | Likely Cause |
| PC shuts down after 30 seconds | Plastic film left on cooler base or pump not plugged in. |
| Idle temps are high (60°C+) | Uneven screw pressure; re-tighten using the cross pattern. |
| Fans are extremely loud | Fan cable plugged into a generic chassis header instead of CPU_FAN. |
How do you troubleshoot processor issues?
Troubleshooting processor issues requires a systematic approach to distinguish between software glitches, thermal throttling, and actual hardware failure. Because the CPU is the “brain” of the system, its symptoms often overlap with RAM or motherboard issues.
1. Identify the Symptoms
The first step is recognizing how the processor is misbehaving.
- Sudden Shutdowns: Usually a safety feature. If the CPU hits its thermal limit (typically 100°C), it will cut power instantly to prevent physical damage.
- Blue Screen of Death (BSOD): Look for specific codes like
WHEA_UNCORRECTABLE_ERROR(hardware failure) orCLOCK_WATCHDOG_TIMEOUT(a core has hung). - System Freezing: If the mouse cursor stops moving and the keyboard (Caps Lock light) doesn’t respond, the processor has likely encountered a fatal instruction error.
- Performance Stuttering: Often caused by “thermal throttling,” where the CPU slows itself down to 800 MHz or 1 GHz to stay cool.
2. The “Physical First” Check
Before diving into software, ensure the physical environment is stable.
- Check for Dust: A clogged heat sink can cause a CPU to overheat even under light loads. Use compressed air to clear the fins.
- Verify Fan Operation: Ensure the CPU fan or AIO pump is spinning. If the
CPU_FANheader on the motherboard is empty or the cable is loose, the system may refuse to boot. - Check Mounting Pressure: If you recently moved your PC or installed a new cooler, the mounting screws might have loosened. Uneven pressure can lead to high temperatures or memory channel failures.
3. Software Diagnostics
If the system is still bootable, use diagnostic tools to pinpoint the bottleneck.
Monitoring Tools
- HWMonitor or HWiNFO64: Use these to check real-time per-core temperatures and voltages. In 2026, look for the “CPU Package” temp; it should be 30°C–45°C at idle.
- Task Manager: Check for “Background Zombies.” Sometimes a single crashed process can pin a core to 100% usage, making the whole system feel laggy.
Stress Testing
- Prime95: The “Gold Standard” for stability. If a core is faulty, Prime95 will throw a “Rounding Error” or the PC will crash within minutes.
- Cinebench 2026: A real-world rendering test. It’s safer for daily use than Prime95 and will show if your CPU is hitting its expected performance scores.
4. Isolate the Hardware
If software tests fail or the PC won’t POST (Power-On Self-Test), you must isolate the components.
- Reset BIOS to Defaults: Enter the BIOS/UEFI and select “Load Optimized Defaults.” This removes any unstable overclocks or incorrect voltage settings.
- The “Clear CMOS” Method: Remove the silver coin-cell battery from the motherboard for 30 seconds. This hard-resets the motherboard’s communication with the CPU.
- One RAM Stick at a Time: Faulty RAM often mimics CPU failure. Test the system with only one stick of memory at a time to rule out a bad DIMM or a dead memory channel on the CPU.
- Check for “Motherboard Beep Codes”: If your motherboard has “Diagnostic LEDs” (small red/white lights labeled CPU, DRAM, VGA), check which one stays lit during boot.
Troubleshooting Summary Table
| If you see… | Try this first… |
| Random Restarts | Check Power Supply (PSU) and VRM temperatures. |
| 100% CPU Usage | Disable “Windows Search” or scan for malware. |
| No Display / Fans Spin | Reseat the CPU and check for bent pins in the socket. |
| Stuttering in Games | Check for thermal throttling or outdated BIOS firmware. |
What are expansion slots?
Expansion slots are specialized connection points on a computer’s motherboard that allow you to add new hardware capabilities to your system. They serve as the physical interface for expansion cards, which can provide everything from high-end graphics and faster networking to professional-grade audio and extra storage.
Think of them as “upgrade ports” that prevent your computer from becoming obsolete. Instead of buying a whole new machine when technology improves, you can simply plug a new card into an expansion slot.
1. Types of Expansion Slots
In 2026, almost all expansion slots use the PCI Express (PCIe) standard. However, these slots come in different physical sizes and “bandwidth” capacities.
- PCIe x16: The longest slot, typically used for Graphics Cards (GPUs). It has the most data “lanes” (16), allowing for the massive amounts of information required for 3D rendering and AI calculations.
- PCIe x4 / x8: Medium-length slots often used for high-speed 10Gb Ethernet cards or M.2 NVMe expansion cards.
- PCIe x1: The smallest slots, used for low-bandwidth devices like Sound Cards, Wi-Fi cards, or extra USB ports.
2. Understanding PCIe Generations
Expansion slots are defined not just by their size, but by their Generation, which determines the speed of the data transfer.
- PCIe 5.0 / 6.0: The current standards in 2026. These offer extreme speeds for the latest Gen5 SSDs and top-tier GPUs.
- Backward Compatibility: One of the best features of expansion slots is that they are cross-compatible. You can plug an older PCIe 3.0 card into a brand-new PCIe 6.0 slot, and it will work perfectly (though at the slower speed of the card).
3. The Role of “Lanes”
A PCIe slot is like a highway. The “x” number (x1, x4, x16) tells you how many lanes that highway has.
- A PCIe 5.0 x16 slot is like a 16-lane highway where the speed limit is incredibly high.
- A PCIe 5.0 x1 slot is a single-lane highway with the same high speed limit. It can move data quickly, but it can’t move as much total volume as the x16 slot.
4. Common Expansion Cards
By using these slots, you can customize a PC for specific professional or personal needs:
| Card Type | Purpose | Common Slot Used |
| Graphics Card (GPU) | Rendering video, gaming, and AI processing. | PCIe x16 |
| Network Interface Card (NIC) | Adding 10Gb or 25Gb fiber-optic internet connections. | PCIe x4 |
| Sound Card | Professional audio recording and high-fidelity output. | PCIe x1 |
| SATA/M.2 Controller | Adding more hard drive or SSD connections than the board has. | PCIe x4 or x8 |
5. Physical Installation
Installing an expansion card is very similar to installing RAM:
- Remove the Metal Bracket: Unscrew the small metal “filler” plate on the back of your computer case.
- Align the Card: Line up the gold contacts on the bottom of the card with the slot.
- Press Firmly: Push straight down until the card clicks into place. Most x16 slots have a plastic “latch” that will snap shut.
- Secure and Power: Screw the card into the case and, if it’s a powerful card like a GPU, plug in the necessary PCIe power cables from your power supply.
What is PCI (Peripheral Component Interconnect)?
ARS Tech Academy
Peripheral Component Interconnect (PCI) is a local computer bus standard for attaching hardware devices to a computer’s motherboard. While it has largely been replaced by the much faster PCIe (PCI Express) in modern systems, PCI was the revolutionary standard that allowed for the “Plug and Play” era of computing.
Before PCI, adding a card to a computer often required manually flipping tiny switches (jumpers) to tell the hardware which memory address to use. PCI automated this process, allowing the system to detect and configure hardware automatically.
1. How the Original PCI Worked
The original PCI bus was a parallel interface. This means it sent data across many wires simultaneously, like a wide bridge where many cars drive side-by-side.
- Shared Bandwidth: All devices on a PCI bus shared the same “pipe.” If you had a sound card and a network card both sending data at the same time, they had to take turns or split the available speed.
- Clock Speed: Standard PCI usually operated at 33 MHz or 66 MHz, with a 32-bit or 64-bit width.
- Voltage: Older cards used 5V (keyed with a notch toward the front), while later cards used 3.3V (keyed toward the back).
2. PCI vs. PCIe (The Modern Successor)
In 2026, you will rarely find a standard PCI slot on a consumer motherboard. It has been replaced by PCI Express (PCIe). The names are similar, but the technology is fundamentally different.
| Feature | Original PCI | PCI Express (PCIe) |
| Data Path | Parallel (shared) | Serial (dedicated “lanes”) |
| Speed | Constant (fixed clock) | Scalable (Gen 1 through Gen 6) |
| Efficiency | Devices share bandwidth | Each device has its own direct path |
| Physical Slot | One standard size | Multiple sizes (x1, x4, x16) |
3. Why Did We Move Away From It?
As processors became faster and data-heavy tasks like 3D gaming and high-speed networking emerged, the original PCI standard hit a “performance ceiling.”
- Synchronization Issues: In a parallel bus, all bits of data must arrive at the same time. At very high speeds, it becomes difficult to keep the electrical signals perfectly aligned across multiple wires.
- Bottlenecks: Because the bandwidth was shared, a single fast device could “choke” the entire bus, slowing down every other card connected to it.
4. Where Is It Used Today?
Even though it is considered “legacy” technology, you might still encounter original PCI in specific environments:
- Industrial Systems: Many factories use specialized control cards that were built 20 years ago and require old PCI slots to function.
- Legacy Audio Gear: Some high-end professional sound cards from the early 2000s still offer superior audio quality and are used in studios with older “bridge” motherboards.
- Specialized Servers: Certain server-grade hardware used for long-term data logging still relies on the stability of the older PCI or PCI-X (Extended) standards.
5. Identifying the Slot
If you are looking at an older motherboard, a PCI slot is usually white and slightly longer than a modern PCIe x1 slot. It has a plastic divider (the key) that prevents you from plugging in a card with the wrong voltage.
What is an AGP (Accelerated Graphics Port)?
Accelerated Graphics Port (AGP) was a high-speed point-to-point channel designed specifically for attaching a video card to a computer’s motherboard. Introduced by Intel in 1996, it served as the bridge between the legacy PCI era and the modern PCIe (PCI Express) era.
Its primary purpose was to provide a dedicated “fast lane” for 3D graphics, which were becoming too data-heavy for the shared, slower PCI bus to handle.
1. Why AGP Was Created
Before AGP, graphics cards sat on the standard PCI bus. As games and professional 3D software became more complex, they ran into two major problems:
- Bandwidth Bottlenecks: PCI was a shared bus. If your hard drive and graphics card both wanted to move data at the same time, they had to fight for the same limited bandwidth.
- Texture Memory Limits: Early graphics cards had very little onboard Video RAM (VRAM). AGP allowed the graphics card to “borrow” system RAM to store textures through a feature called DIME (Direct Memory Execute).
2. Evolution and Speeds
AGP went through several iterations, each doubling the bandwidth of the previous version. By the time it reached its final stage, it was significantly faster than the original PCI bus.
| Version | Speed | Bandwidth | Voltage |
| AGP 1.0 (1x, 2x) | 66 MHz | Up to 533 MB/s | 3.3V |
| AGP 2.0 (4x) | 66 MHz | Up to 1.06 GB/s | 1.5V |
| AGP 3.0 (8x) | 66 MHz | Up to 2.13 GB/s | 0.8V |
3. Physical Identification and Compatibility
AGP slots were usually dark brown, though some manufacturers used different colors. One of the most critical aspects of AGP was the voltage keying. Because different generations used different voltages, the slots had plastic “keys” (dividers) to prevent you from plugging a newer 0.8V card into an older 3.3V motherboard, which could cause a fire.
- Universal AGP: Some motherboards featured a “Universal” slot with no dividers, which could accept any AGP card.
- The “Pro” Slot: You may also see AGP Pro slots, which were longer and provided extra power for high-end workstation cards used in CAD and 3D modeling.
4. The Shift to PCIe
By 2004, even AGP 8x could no longer keep up with the demands of modern GPUs. It was replaced by PCI Express (PCIe) for several reasons:
- Parallel vs. Serial: Like PCI, AGP was a parallel interface. PCIe moved to a serial “lane” architecture, which allowed for much higher speeds without electrical interference.
- Unidirectional vs. Bidirectional: AGP was primarily designed to send data to the card. PCIe allows for massive amounts of data to flow simultaneously both to and from the card.
- Power Delivery: AGP was limited in how much electricity it could provide. Modern GPUs require much more power than the AGP slot could safely deliver.
5. AGP in 2026
In 2026, AGP is strictly a legacy technology. You will not find an AGP slot on any modern motherboard. However, it remains highly relevant in the retro-computing and digital preservation communities. Many enthusiasts maintain “late-90s” or “early-2000s” builds to run software and games that rely on specific AGP-era drivers or hardware behaviors.
What is PCIe (Peripheral Component Interconnect Express)?
PCI Express (PCIe) is the high-speed serial expansion bus standard used in almost all modern computers. It serves as the primary communication “highway” connecting the processor (CPU) to critical high-performance components like graphics cards, NVMe solid-state drives, and high-speed network adapters.
Unlike its predecessors (PCI and AGP) which used a “parallel” architecture where devices shared a single data path, PCIe uses a point-to-point serial architecture. This means every device has its own dedicated connection to the CPU or chipset, ensuring that one slow device doesn’t “clog” the highway for everyone else.
1. How It Works: Lanes and Links
The performance of a PCIe connection is determined by the number of lanes it uses. A “lane” consists of two pairs of wires—one for sending data and one for receiving it simultaneously.
- Physical Sizes: Slots are identified by their “x” (by) notation, which indicates the number of lanes:
- x1: Smallest slot, used for Wi-Fi cards or sound cards.
- x4: Used for many NVMe SSD expansion cards.
- x8: Used for high-end networking or RAID controllers.
- x16: The longest slot, used for Graphics Cards (GPUs) to provide maximum bandwidth.
- Flexibility: You can physically plug a smaller card (like an x1) into a larger slot (like x16), and it will work perfectly. This is known as “up-plugging.”
2. Generations and Bandwidth
PCIe is a living standard that is updated every few years. Each new generation roughly doubles the data transfer rate of the previous one.
As of 2026, we are transitioning into the era of PCIe 6.0, though PCIe 5.0 remains the standard for most high-end consumer hardware.
| Generation | Released (Approx) | Bandwidth (per lane, x1) | Bandwidth (x16 slot) |
| PCIe 3.0 | 2010 | ~1 GB/s | ~16 GB/s |
| PCIe 4.0 | 2017 | ~2 GB/s | ~32 GB/s |
| PCIe 5.0 | 2019/2021 | ~4 GB/s | ~64 GB/s |
| PCIe 6.0 | 2022/2024 | ~8 GB/s | ~128 GB/s |
3. Why Serial is Better Than Parallel
It seems counter-intuitive that a serial connection (sending bits one after another) would be faster than a parallel connection (sending bits side-by-side). However, PCIe solved a major problem called “Clock Skew.”
In old parallel systems (like PCI), all bits had to arrive at exactly the same time. As speeds increased, it became impossible to keep the signals perfectly synchronized across multiple wires. Because PCIe is serial, it doesn’t have to wait for other bits to arrive; it just sends data as fast as the electrical frequency allows.
4. Key Features of PCIe
- Backward Compatibility: You can plug a PCIe 3.0 graphics card into a PCIe 5.0 motherboard, or a PCIe 5.0 SSD into a PCIe 4.0 slot. The system will simply run at the speed of the slowest component.
- Direct CPU Connection: Most modern CPUs have a set of “Direct PCIe Lanes.” These are reserved for the GPU and the primary M.2 SSD to ensure the lowest possible latency (delay) when the CPU needs to access data.
- Hot-Plugging: Some high-end PCIe implementations (mostly in servers) allow you to add or remove cards while the computer is still running.
5. Identifying PCIe on Your Motherboard
On a standard motherboard, the top x16 slot is usually the “strongest,” wired directly to the CPU with the latest generation speeds. Lower slots often go through the Chipset, which might introduce a tiny bit of extra delay.
In 2026, look for slots that are “reinforced” with metal—this is to support the massive weight of modern graphics cards and prevent the PCIe slot from snapping.
What are chipsets?
In computing, a chipset is a set of electronic components on a motherboard that manages the data flow between the processor, memory, and peripherals. If the CPU is the “brain” of the computer, the chipset acts as the nervous system or the traffic controller, determining which parts of the computer can talk to each other and how fast that conversation happens.
Historically, motherboards used two main chips: the Northbridge (handling high-speed tasks like RAM and Graphics) and the Southbridge (handling slower tasks like USB and SATA). In modern systems, most “Northbridge” functions have been moved directly onto the CPU, leaving a single chip—the PCH (Platform Controller Hub)—to act as the chipset.
1. Primary Functions of a Chipset
The chipset defines the “personality” and expansion limits of your motherboard:
- Connectivity: It determines how many USB ports, SATA drives (hard drives), and PCIe lanes you can have.
- Communication: It bridges the CPU to slower components. While the CPU talks directly to the GPU and RAM, it goes through the chipset to talk to your keyboard, mouse, and Wi-Fi card.
- Feature Set: The chipset dictates whether you can overclock your CPU, run multiple graphics cards, or use specific RAID storage configurations.
2. Chipset Tiers (Intel vs. AMD)
Both Intel and AMD release different “tiers” of chipsets for every CPU generation. Choosing the right one is a balance between your budget and the features you need.
Intel Chipsets (e.g., 700/800 Series)
- Z-Series (e.g., Z790/Z890): The enthusiast tier. Supports full CPU and RAM overclocking and the maximum number of high-speed PCIe lanes.
- B-Series (e.g., B760): The mainstream tier. Great for gaming; usually supports RAM overclocking but not CPU overclocking.
- H-Series (e.g., H710): The budget tier. Limited ports and lanes; best for basic office or home use.
AMD Chipsets (e.g., 600/800 Series)
- X-Series (e.g., X670E/X870): High-end. Offers the most PCIe 5.0 lanes for multiple GPUs and NVMe drives.
- B-Series (e.g., B650/B850): The “sweet spot.” Supports CPU and RAM overclocking with plenty of connectivity for most users.
- A-Series (e.g., A620): Entry-level. No CPU overclocking and fewer high-speed ports.
3. The “Bus” Connection (DMI vs. Infinity Fabric)
The link between the CPU and the chipset is a high-speed “highway.”
- Intel calls this the DMI (Direct Media Interface).
- AMD uses a specialized PCIe link to connect the processor to the chipset.
If you plug too many high-speed devices (like four NVMe SSDs) into the chipset-controlled slots, you may experience a bottleneck because they all have to share that single “highway” back to the CPU.
4. Why the Chipset Matters for Upgrades
When you buy a new processor, you must ensure the chipset on your motherboard supports it.
- Socket Compatibility: A CPU might physically fit into the socket, but if the chipset doesn’t have the correct “firmware” to talk to that specific CPU generation, the computer won’t boot.
- Generational Features: Even if a newer CPU works in an older chipset, you might miss out on new features like PCIe 5.0 or Wi-Fi 7 support if the chipset hardware doesn’t include those controllers.
Summary Table: Which Chipset Do You Need?
| User Type | Recommended Tier | Key Reason |
| Professional / Enthusiast | Intel Z-series / AMD X-series | Maximum storage, high-speed I/O, and overclocking. |
| Gamer / Power User | Intel B-series / AMD B-series | Best value; supports fast RAM and modern GPUs. |
| Office / Student | Intel H-series / AMD A-series | Reliable for daily tasks and web browsing. |
What are the different types of motherboards?
Motherboards are primarily categorized by their Form Factor, which defines their physical dimensions, mounting hole locations, and the number of expansion slots they can support. Choosing the right type depends on how much space you have in your computer case and how many components (like GPUs or RAM sticks) you plan to install.
1. Standard Form Factors
The vast majority of consumer and professional PCs use one of these four standardized sizes.
ATX (Advanced Technology eXtended)
- Dimensions: 12 × 9.6 inches (305 × 244 mm).
- Best For: Full-sized gaming PCs and workstations.
- Features: This is the most popular type. It typically offers 4 RAM slots and up to 7 expansion slots (PCIe), providing the most room for multiple GPUs, sound cards, and storage controllers.
Micro-ATX (mATX)
- Dimensions: 9.6 × 9.6 inches (244 × 244 mm).
- Best For: Budget builds and mid-sized towers.
- Features: A square-shaped board that is shorter than standard ATX. It usually has 2 to 4 RAM slots and about 4 expansion slots. It fits in almost all ATX cases but allows for smaller “mini-tower” enclosures.
Mini-ITX
- Dimensions: 6.7 × 6.7 inches (170 × 170 mm).
- Best For: Ultra-compact PCs and Home Theater PCs (HTPCs).
- Features: These are tiny boards designed for small-form-factor (SFF) cases. To save space, they only have one PCIe slot (for a single GPU) and usually only 2 RAM slots. Despite their size, high-end ITX boards often feature built-in Wi-Fi and Bluetooth.
E-ATX (Extended ATX)
- Dimensions: Typically 12 × 13 inches (305 × 330 mm).
- Best For: Enthusiast builds and high-end servers.
- Features: Wider than standard ATX to accommodate more complex circuitry, extra RAM slots (up to 8), or even dual CPU sockets. These require a “Full Tower” case.
2. Specialized and Industrial Types
Beyond the standard consumer sizes, there are motherboards built for specific professional or high-density environments.
- Server/Workstation Boards: Often use the SSI CEB or SSI EEB standards. They are built for 24/7 operation and often feature specialized chips for remote management (IPMI) and ECC (Error-Correcting) memory support.
- Single-Board Computers (SBC): Devices like the Raspberry Pi. The CPU, RAM, and I/O are all integrated into a single small circuit board. These are used for DIY projects, robotics, and IoT devices.
- BTX (Balanced Technology eXtended): A legacy standard designed to improve airflow over ATX. While it was technically superior for cooling, it never gained mainstream popularity and is rarely seen today.
3. Comparison of Common Sizes
| Form Factor | Dimensions | Typical RAM Slots | Expansion Slots | Best Use Case |
| E-ATX | 12″ × 13″ | 8 | 4–7 | High-end Workstations |
| ATX | 12″ × 9.6″ | 4 | 3–5 | Gaming / General Purpose |
| Micro-ATX | 9.6″ × 9.6″ | 2–4 | 2–3 | Budget / Compact Desktop |
| Mini-ITX | 6.7″ × 6.7″ | 2 | 1 | Ultra-small Gaming / HTPC |
PowerCert Animated Videos
4. How to Choose
When selecting a motherboard type, keep these two rules in mind:
- Case Compatibility: A large case can almost always fit a smaller motherboard (e.g., an ATX case can fit a Mini-ITX board), but a small case cannot fit a larger motherboard.
- Mounting Holes: Motherboard types are designed with specific mounting hole patterns that align with “standoffs” inside the computer case. Always ensure your case supports the specific form factor of your board.
When is a good time to upgrade a motherboard and when should it be replaced?
Deciding between a motherboard upgrade and a replacement depends on whether you are seeking new features or solving a hardware failure. Because the motherboard is the foundation of your system, changing it usually requires a significant “rebuild” of your PC.
When to Upgrade (Seeking Better Performance)
An upgrade is a proactive choice to keep up with modern technology. You should consider upgrading your motherboard in the following scenarios:
1. Moving to a New CPU Generation
If you want to install a new processor but your current motherboard uses an older Socket (e.g., trying to move from an Intel LGA 1700 to an LGA 1851), you must upgrade. Motherboards and CPUs are physically tied together by these sockets.
2. Upgrading RAM Architecture
If you are moving from DDR4 to DDR5 memory, you need a new motherboard. The slots are physically different, and the electrical controllers for DDR5 are built into newer board designs.
3. Needing Faster I/O (Data Speed)
If you are a professional working with massive files (like 4K/8K video or large-scale physics simulations) and your current board doesn’t support:
- PCIe 5.0/6.0: For the latest ultra-fast NVMe SSDs.
- USB4 or Thunderbolt 5: For high-speed external data transfer.
- Wi-Fi 7 or 10Gb Ethernet: For modern high-speed networking.
When to Replace (Solving Hardware Failure)
A replacement is a reactive move because the board is no longer functioning correctly. You should replace your board if you experience:
1. Physical Damage or “Capacitor Plague”
Motherboards are full of electrical components like capacitors and VRMs (Voltage Regulator Modules). If you see bulging or leaking capacitors, or if there is a literal “burn mark” on the board, it must be replaced immediately.
2. Persistent Stability Issues
If you have ruled out the Power Supply, RAM, and Software, but still experience:
- Random BSODs (Blue Screens): Specifically those related to hardware interrupts.
- Dead Ports: If USB ports or PCIe slots stop working one by one.
- Failure to POST: The fans spin, but the motherboard’s diagnostic LEDs stay stuck on “CPU” or “DRAM” even after testing those parts elsewhere.
3. Out-of-Warranty Failure
If a motherboard fails after its 3-year or 5-year warranty period, it is rarely cost-effective to repair it. In 2026, the labor cost for specialized micro-soldering often exceeds the price of a brand-new, more modern board.
Upgrade vs. Replace Comparison
| Factor | Upgrade | Replace |
| Primary Goal | Better speed/new features. | Restoring a broken system. |
| CPU Compatibility | Usually requires a new CPU. | Usually uses your existing CPU. |
| Windows OS | May require a clean install/re-activation. | Often works with existing install (if same model). |
| Effort Level | High (Complete rebuild). | High (Complete rebuild). |
A “Strategic” Tip
If you are currently building a PC in Calgary or elsewhere in 2026, choosing a platform with longevity (like AMD’s AM5 socket) allows you to upgrade the CPU several times over five years without having to replace the motherboard. This saves you the time and hassle of a full system teardown.
How do you troubleshoot a motherboard?
Troubleshooting a motherboard is a process of elimination. Since the motherboard connects every other component, a failure here can look like a CPU, RAM, or Power Supply issue.
Here is the systematic “outside-in” approach to identifying a motherboard fault.
1. The Visual Inspection
Before turning the system on, look for physical signs of electrical or structural failure.
- Blown Capacitors: Look for small cylindrical components that are bulging at the top or leaking a brownish fluid.
- Burn Marks: Smell the board for a “burnt electronics” scent and look for charred spots near the VRMs (the components surrounding the CPU socket).
- Bent Pins: If you recently installed a CPU, check the socket. A single bent pin can prevent the memory controller or PCIe lanes from functioning.
- Motherboard Standoffs: Ensure the board is mounted on brass standoffs. If the board is touching the metal case directly, it will short-circuit and may refuse to boot.
2. Decode Diagnostic Signals
Modern motherboards try to tell you what is wrong through three main methods:
- POST Status LEDs: Most boards in 2026 have four tiny LEDs labeled CPU, DRAM, VGA, and BOOT. If the light stays stuck on “DRAM,” the motherboard cannot communicate with your memory.
- Beep Codes: If you have a small speaker plugged into the “Speaker” header, the motherboard will emit a series of beeps (e.g., 1 long, 2 short). You must look up your specific motherboard manual to decode these.
- Q-Code/Debug Display: High-end boards have a two-digit LED readout (e.g., “00” or “A2”). These codes provide the most specific information about exactly where the boot process is failing.
3. The “Clear CMOS” Reset
Sometimes a motherboard “locks up” due to an unstable overclock or a corrupted BIOS setting.
- Power Down: Unplug the PC from the wall.
- Remove the Battery: Locate the CR2032 silver coin battery and remove it for 30 seconds.
- Short the Jumpers: Alternatively, find the two pins labeled
CLR_CMOSand touch them with a screwdriver for 5 seconds. - Result: This resets the motherboard to factory default settings, which often resolves “no-boot” issues.
4. Breadboarding (Testing Outside the Case)
If the system still won’t POST, you must rule out a “short” caused by the computer case. This is called breadboarding.
- Place the motherboard on its cardboard box (never on the anti-static bag, which can be conductive on the outside).
- Install only the CPU, one stick of RAM, and the Power Supply.
- Use a screwdriver to briefly touch the two “Power Switch” pins to turn it on.
- If it boots here but not in the case, your case or a stray screw was causing a short circuit.
5. Isolate the “Nervous System”
If the board powers on but behaves erratically, test the individual controllers:
- USB/SATA Ports: If one USB port works but another doesn’t, a specific controller chip on the board may be dead.
- PCIe Slots: Move your graphics card to a different slot. If it works in the bottom slot but not the top, the primary PCIe lanes (or the slot itself) are faulty.
- RAM Slots: Test your RAM in different slots. Often, a motherboard failure will kill “Channel A” while “Channel B” remains functional.
Summary Checklist
| Symptom | Potential Fix |
| No power at all | Check 24-pin and 8-pin EPS cables; test PSU. |
| Fans spin, no display | Clear CMOS; reseat RAM; check Diagnostic LEDs. |
| Random Freezing | Check VRM temperatures; update BIOS firmware. |
| USB/Audio not working | Reinstall chipset drivers; check for physical port damage. |
What is the relationship between ai and the motherboard?
In 2026, the relationship between Artificial Intelligence and the motherboard has evolved from simple hardware support to an active partnership. The motherboard is no longer just a “dumb” circuit board; it has become an intelligent manager that uses AI to optimize power, cooling, and data flow in real-time.
The relationship can be broken down into three primary categories:
1. Hardware Support (The Infrastructure)
For AI to function—whether you are running a local LLM or training a neural network—the motherboard must provide the specialized “roads” and “fuel” those processes require.
- NPU Integration: Modern motherboards are designed to interface with the NPU (Neural Processing Unit) built into the latest Intel Core Ultra and AMD Ryzen AI processors. The motherboard ensures the NPU has direct, low-latency access to system resources.
- PCIe 5.0/6.0 Lanes: AI workloads involve moving massive amounts of data between the CPU and the GPU. The motherboard provides the high-bandwidth PCIe lanes necessary to prevent bottlenecks during data-heavy AI operations.
- Massive Power Delivery (VRMs): AI processing is power-hungry. Motherboards now feature heavy-duty Voltage Regulator Modules (VRMs) to provide the stable, precise electricity needed for long AI “inference” or training sessions without crashing.
2. AI-Driven Motherboard Management (Onboard Intelligence)
Motherboard manufacturers (like ASUS, Gigabyte, and MSI) now embed AI microcontrollers directly into the board’s circuitry to manage the hardware itself.
- AI Overclocking: Instead of manual tuning, the motherboard uses AI to monitor your specific CPU’s “silicon quality” and cooling capacity. It then automatically pushes the clock speeds to the highest stable limit.
- AI Cooling & Acoustics: The motherboard analyzes your room’s ambient temperature and your typical usage patterns. It creates a custom “fan curve” that provides maximum cooling during AI renders but stays silent during basic tasks like reading or writing.
- AI Networking: The board prioritizes data packets based on what you are doing. If you are streaming an AI model from the cloud, the motherboard’s AI networking engine will give that traffic “priority” over background Windows updates to reduce lag.
3. The “Smart” Nervous System: Data Management
The motherboard acts as the translator between the AI software and the physical components.
- Memory Training: AI is extremely sensitive to RAM speed and latency. When you first boot a PC, the motherboard performs “AI Memory Training” to find the most efficient timing settings for your specific RAM sticks, ensuring the AI has the fastest possible access to data.
- Predictive Maintenance: Some 2026 motherboards use AI to monitor electrical patterns. They can predict if a component (like a VRM or a connected SSD) is likely to fail soon based on “noise” in the electrical signal, allowing you to back up your work before a crash occurs.
Comparison: Traditional vs. AI-Enhanced Motherboards
| Feature | Traditional Motherboard | AI-Enhanced Motherboard (2026) |
| Power Delivery | Fixed voltage based on presets. | Dynamic voltage that predicts CPU spikes. |
| Fan Control | Standard temperature-based speeds. | Predictive cooling based on learned workloads. |
| Overclocking | Manual trial and error. | One-click AI-optimized performance. |
| Diagnostics | Basic beep codes or LEDs. | Predictive failure alerts and guided repair steps. |
The Big Picture
If the CPU is the brain and the AI is the thought process, the Motherboard is the central nervous system. It doesn’t just hold the parts together; it ensures the electrical and data environments are perfectly tuned so the AI can run at maximum efficiency.
Solved Problems
Based on our deep dive into processors, motherboards, expansion slots, and the integration of AI, here are 20 high-level application problems an IT technician might face, categorized by the specific technical domain.
Processor & Thermal Troubleshooting
1. Problem: System “Black-Screening” during high-load physics simulations.
- Solution: Check for thermal throttling or emergency shutdown. Inspect the heat sink for dust or “pump-out” (where thermal paste has migrated). Re-apply high-conductivity thermal paste using the “pea” method.
2. Problem: New CPU installed, but the motherboard won’t POST (Power-On Self-Test).
- Solution: Perform a BIOS update using a USB Flashback port (if available) with the old CPU re-installed, ensuring the chipset firmware recognizes the new processor architecture.
3. Problem: CPU idling at $70\text{°C}$ despite a high-end AIO liquid cooler.
- Solution: Check if the plastic protective film was left on the cooler’s copper base. Verify the pump is connected to the
AIO_PUMPheader and running at $100\%$ speed.
4. Problem: “WHEA_UNCORRECTABLE_ERROR” BSOD after manual overclocking.
- Solution: The Vcore voltage is likely insufficient for the set multiplier. Incrementally increase voltage by $0.01\text{V}$ or lower the clock frequency to regain electrical stability.
5. Problem: Processor pins are bent on a modern LGA 1851 socket.
- Solution: Use a mechanical pencil (with no lead) or a fine needle under a magnifying glass to gently realign the pins. If multiple pins are snapped, the motherboard must be replaced.
Motherboard & Chipset Configuration
6. Problem: NVMe SSD is running at half its rated speed.
- Solution: Check the motherboard manual to see if the M.2 slot shares lanes with the GPU. Move the SSD to a “Direct CPU” slot rather than a chipset-mediated slot.
7. Problem: USB devices disconnecting when the GPU is under heavy load.
- Solution: This suggests a chipset bottleneck or PCIe signal interference. Update the chipset drivers and check if the BIOS needs a “PCIe Gen” lock (e.g., forcing a Gen 4 slot to run at Gen 3 for stability).
8. Problem: Motherboard “DRAM” diagnostic LED stays lit.
- Solution: Reseat the RAM sticks. Try “breadboarding” the system with a single stick in various slots to determine if a specific memory channel on the motherboard or CPU has failed.
9. Problem: BIOS settings (like overclocking profiles) reset every time the PC is unplugged.
- Solution: Replace the CR2032 CMOS battery. The voltage has likely dropped below the threshold required to maintain the volatile BIOS memory.
10. Problem: Front-panel USB-C port isn’t working at 20Gbps speeds.
- Solution: Ensure the internal header cable is fully seated and that the motherboard chipset actually supports the USB 3.2 Gen 2×2 standard.
Expansion Slots & Connectivity
11. Problem: A high-end GPU is sagging and causing intermittent display loss.
- Solution: Inspect the PCIe x16 slot for physical stress cracks. Install a GPU support bracket and ensure the PCIe retention latch is fully engaged.
12. Problem: A legacy PCI sound card won’t fit into a modern motherboard.
- Solution: Identify that the board uses PCIe (Serial) while the card is PCI (Parallel). Use a PCIe-to-PCI bridge adapter or replace the card with a modern PCIe x1 version.
13. Problem: Installing a second GPU causes the first GPU to drop from x16 to x8 speed.
- Solution: This is expected behavior on mainstream chipsets where PCIe lanes are bifurcated (split). Explain to the user that total bandwidth is shared between the top two slots.
14. Problem: A 10Gb Ethernet card is only achieving 1Gb speeds.
- Solution: Verify the card is in a PCIe slot with enough lanes (usually x4) and that the chipset hasn’t throttled that slot due to other occupied ports.
15. Problem: An AGP graphics card was found in an old workstation and needs to be tested.
- Solution: Determine the voltage (1.5V vs 3.3V) by looking at the keying notches. Find a legacy motherboard with a matching AGP slot; do not attempt to force it into a PCIe slot.
AI & Advanced Integration
16. Problem: Local AI LLM (Large Language Model) is running extremely slow.
- Solution: Check if the NPU is enabled in the BIOS. Ensure the AI software is pointed toward the dedicated NPU or GPU rather than the general-purpose CPU cores.
17. Problem: Motherboard AI Overclocking keeps crashing the system.
- Solution: The AI has likely overestimated the “Silicon Prediction” (SP) score. Clear CMOS and re-run the AI training with a more conservative “Optimism Scale” setting in the BIOS.
18. Problem: AI-driven fans are spinning up and down erratically (fan hunting).
- Solution: Adjust the “Step-Up/Step-Down” time in the AI cooling software to introduce a delay, preventing the fans from reacting to instantaneous, micro-second temperature spikes.
19. Problem: Predictive Maintenance alert warns of “Electrical Noise” on the 12V rail.
- Solution: Inspect the motherboard’s VRM area for heat discoloration. Test the system with a known-good Power Supply (PSU) to see if the “noise” is coming from the wall or the board itself.
20. Problem: AI Memory Training fails on every boot, prolonging startup time.
- Solution: Update the BIOS to improve memory compatibility. If issues persist, manually set the primary RAM timings (CAS Latency) to “Relaxed” settings to help the AI find a stable boot state.
To help you visualize these IT scenarios, I’ve organized the core troubleshooting logic into three targeted flowcharts. These maps follow the “outside-in” methodology we discussed.
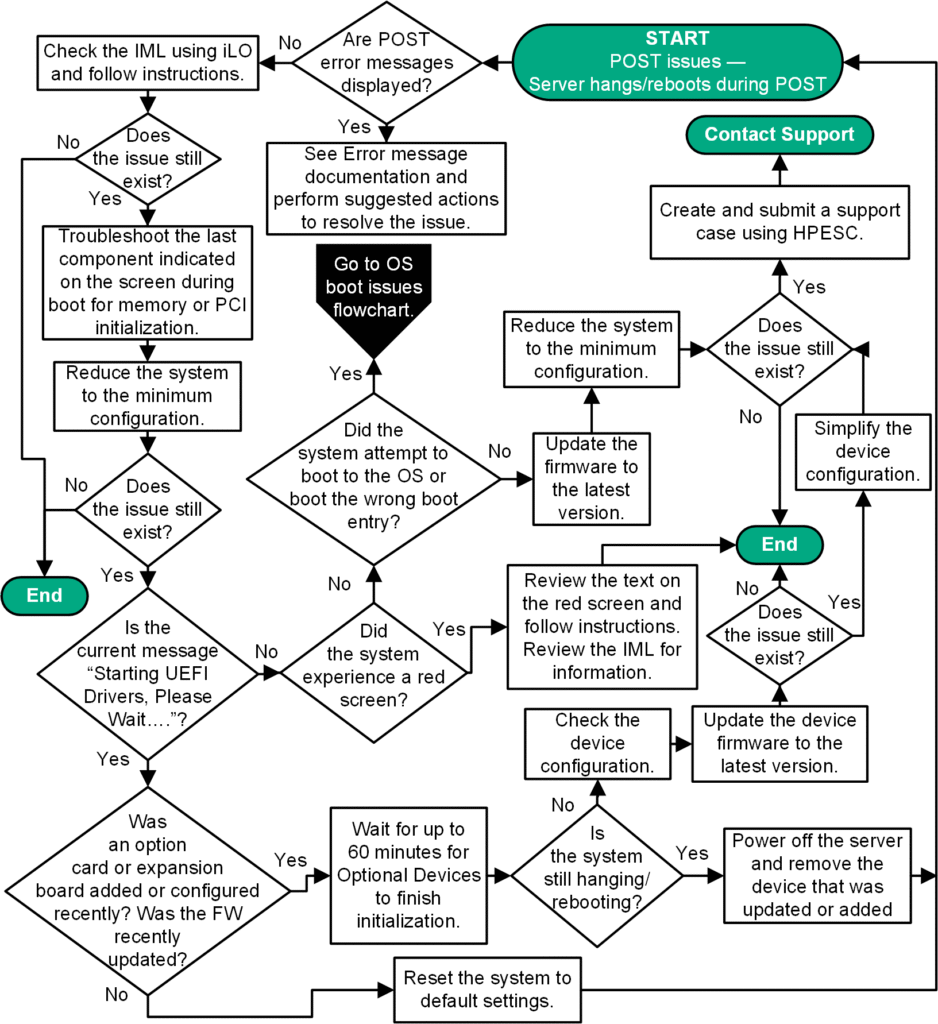
1. The “No POST” (Power-On Self-Test) Flowchart
This is the most common high-level problem: the fans spin, but the screen stays black.
- Step 1: Check Diagnostic LEDs
- If CPU light is on $\rightarrow$ Check 8-pin power cable $\rightarrow$ Reseat CPU $\rightarrow$ Check for bent socket pins.
- If DRAM light is on $\rightarrow$ Test one RAM stick at a time in different slots.
- Step 2: Clear CMOS
- Remove battery/short jumpers → Reset to factory defaults.
- Step 3: Breadboarding
- Still nothing? Remove motherboard from case → Test on a cardboard box to rule out a short circuit.
2. Thermal & Stability Flowchart
Use this when the system boots but crashes or stutters during heavy workloads like calculus simulations or AI rendering.
- Step 1: Monitor Real-Time Temps
- Idle > 50°C or Load > 95°C? → Proceed to physical check.
- Step 2: Physical Cooler Audit
- Is the pump vibrating? (Liquid) / Is the fan spinning? (Air)
- Remove cooler → Check for “plastic film” mistake → Re-apply paste using the cross-pattern mounting method.
- Step 3: Stress Test
- Run Cinebench or Prime95 → If it crashes instantly, investigate VRM overheating or Vcore voltage instability.
3. The “Expansion & Throughput” Flowchart
Use this when hardware is detected but underperforming (e.g., slow SSDs or GPUs).
- Step 1: Identify the Lane Source
- Is the device plugged into a CPU-direct slot or a Chipset slot?
- Step 2: Check for Lane Bifurcation
- Are multiple PCIe cards installed? $\rightarrow$ Check if the x16 slot has dropped to x8 speed.
- Step 3: BIOS Protocol Check
- Is the slot set to the correct Generation (Gen 4/5/6)? → Ensure the chipset firmware is updated to handle high-bandwidth AI traffic.
Summary Cheat Sheet for the Workbench
| Component | Top “Red Flag” | Quick Fix |
| Processor | 100°C Thermal Throttling | Clean fins; check mounting pressure. |
| Motherboard | Bulging Capacitors / Burnt smell | Immediate replacement required. |
| Expansion | “Device Not Found” in BIOS | Reseat card; check for shared lane conflict. |
| AI Integration | High latency/NPU lag | Update BIOS; verify “AI Memory Training” passed. |
What is the relationship between information technology hardware and software?